How to Use Galileo Cloud Compass | Step by Step
If you’re going to move assets to Azure – or any public cloud, you’re going to need some help.
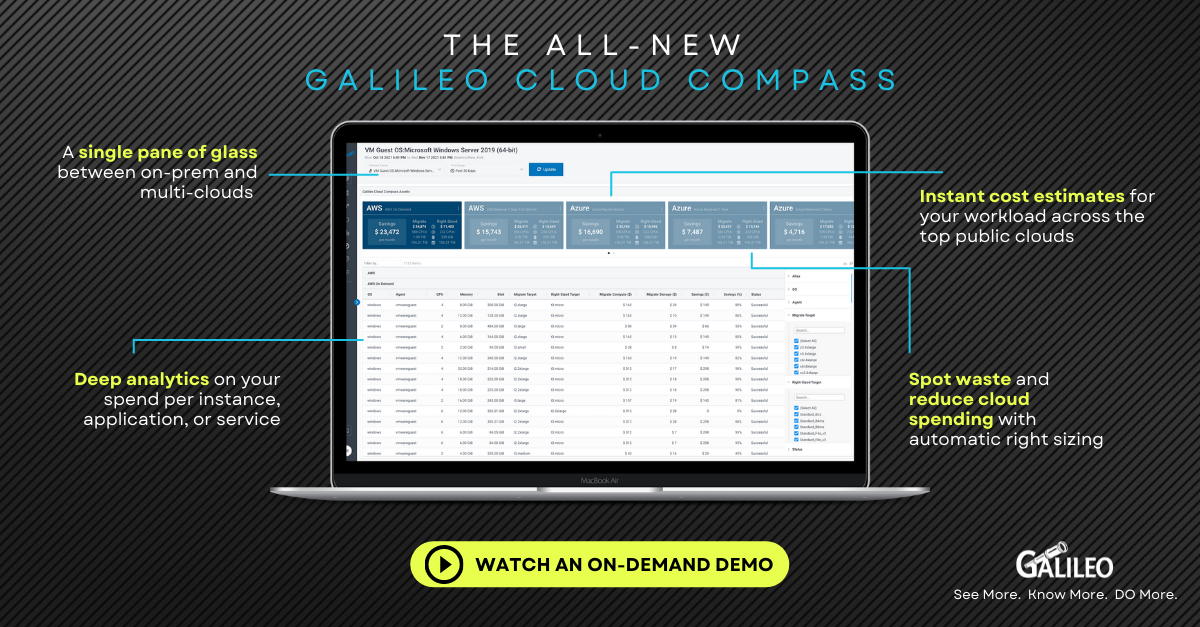
As a cloud consulting firm with a top-notch infrastructure performance monitoring application, we help enterprises navigate obstacles on the path to the cloud all the time. We’ve also felt the pain of sizing and pricing in our cloud journey, too. That’s why we created Galileo Cloud Compass (or GCC as we sometimes call it). It removes the guesswork associated with sizing and provisioning your environment so you can avoid getting hit with a massive cloud bill once you make a move. With Cloud Compass, you will know BEFORE you go. Since GCC greatly simplifies a cloud journey, we wanted to show you how easy it is. This post will go through the process step-by-step using one of our customers as an example. In summary, they migrated a workload to Microsoft Azure, and they were floored when they received their first bill. We talked about this customer in detail here if you want to know more about their story, but suffice to say, they needed to reduce their costs…like now. How did they use GCC to do this? OK, let’s dive in.
Step 1: Install Galileo
For this example, we’re showing a Galileo customer with a year and a half worth of historical data collected at the time of the exercise. Their original Galileo installations included Linux and Windows-based operating system agents, consisting of a simple RPM and MSI installer. Galileo can also collect many virtual machines from VMware and Nutanix. These, too, are simple one-time installations on a Linux collection box pointing the agent to Prism Central and vCenter. *Note: Galileo installation is simple. You’ll be up and running in under two hours.
Step 2: Build History
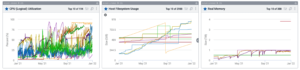
After the installations were complete, we needed to build some history to find the organization’s peak periods to right-size the systems before taking them to Azure, their cloud of choice. The customer’s peak periods, when these systems were their busiest, included month-end, year-end, and a busy Holiday season.
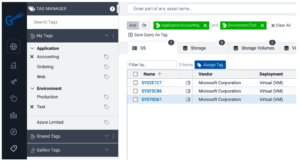
Step 3: Identify and Tag Your Systems
The company wasn’t moving all their systems to Azure – only a subset. Of course, Galileo Cloud Compass can price individual systems, but we reported on pricing for groups of systems using the Galileo tagging feature in this instance. Some of the system tags we used were “Ordering,” “Accounting,” and “Web Infrastructure.”
Step 4: Model for Peak Workloads
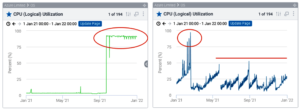
Next, we selected periods to model our workload using the tags we created. The peak workloads were well known, but we were able to verify that using the long performance history in Galileo to make sure we were not missing anything. One of the notable features of Galileo Cloud Compass is its speed. We can scan two years’ worth of data peaks in no time at all to make sure we’ve captured everything. It’s worth noting we are referring to original data points. In Galileo, there is no rollup or aggregation, so we were confident we had everything we needed.
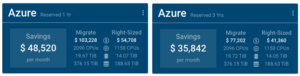
Step 5: Compare Azure Pricing Profiles
It was effortless to compare different pricing profiles once we tagged the systems and selected the appropriate timeframe. Because the pricing cards display simultaneously, we can easily see what a one-year reserve would save them versus a 3-year. We can also choose the “pay-as-you-go” model, but it wasn’t the right option for this production workload. The Migrate and Right-Sized columns in the profile cards show the costs to move as-is (read: lift-n-shift) versus right-sizing. Now, this is where the real power and benefits shine.
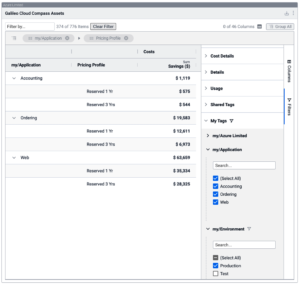
Step 6: Analyze Pricing by Tags
Because you can tag individual assets in countless ways, Galileo makes it easy to take your feasibility study one step further. We can also examine the costs to migrate in phases – for example, by environment or application. Since all the pricing models are stored in Galileo and applied at once at runtime, we could see their entire environment and its cost for compute and storage in Azure with minimal effort. And that’s it!
Try it
Moving to the cloud is exciting but doing the laborious work of collecting data, analyzing peak workloads, and comparing pricing profiles is time-consuming and error-prone. However, all of this tedious work is done for you with the click of a button. There is a lot of money to be saved. It is worth trying. What do you have to lose?